Installing and running the platform
Currently we support Unix-like systems (for example, popular Linux distributives and MacOS). However Waves Enterprise platform can be run under the Windows natively in experimental mode. Also you can you Unix virtual machines and the Docker environment for the installation and running the platform under the Windows.
Installation of the platform in the base delivery version assumes that Docker Engine and Docker Compose are installed in the deployment environment.
Depending on the purpose of the installation, you will need the following files:
docker-compose.yml– the configuration file used by Docker Compose to run applications in containers.generators-Х.Х.Х.jar- an auxiliary utility used in the Waves Enterprise platform to create key pairs, API keys, sign block genesis and other operations.
docker-compose.yml and generators-Х.Х.Х.jar you can download by clicking on the link.
Configuration files for
generators-Х.Х.Х.jarutility:accounts.conf- he configuration file for the accounts creation;api-key-hash.conf– the configuration file for theapi-key-hashandprivacy-api-key-hashvalues creation when you choose theapi-keystring hash authorization.
node.conf– the main node configuration file defining the operational principals and an option list. Below are some examples of node configuration files:mainnet.conf- to connect to the Mainnet network;partnernet.conf- to connect to the Partnernet network.
Examples of configuration files for the utility generators-Х.Х.Х.jar and node.conf you can download from the Waves Enterprise platform official page on GitHub.
Detailed information about configuration files can be found in Data preparation service module.
node.license- node license, not obligatory up to 30,000 blocks height.
You can find out about how to get node.license in the following module.
Purpose of installation |
docker-compose.yml |
generators-X.X.X.jar |
node.conf |
node.license |
|---|---|---|---|---|
Checking platform features |
Required |
It’s not required |
It’s not required |
It’s not required |
Connecting the node to the Mainnet network |
Required |
Required |
Required |
Required |
Connecting the node to the Partnernet network |
Required |
Required |
Required |
Required |
Deploying the platform in Sandbox mode
The Waves Enterprise team offers a fully automated deployment mode to familiarize yourself with platform capabilities. n this mode, a blockchain network of three nodes will be installed as well as additional components - authorization service, data preparation service and corporate client. All key pairs used to sign transactions and blocks will be generated randomly.
In the trial mode you can interact with the blockchain through the client application, or REST/gRPC node interfaces: send transactions, receive data from the blockchain, set and call smart contracts, and transfer confidential data between nodes.
To install the platform in Sandbox mode, open the terminal and go to the directory where the file
docker-compose.ymlis located, and execute the following command:
docker run --rm -ti -v $(pwd):/config-manager/output wavesenterprise/config-manager:v1.2.0
Specify the latest version of the platform as the last three digits.
Wait for the results of the previous command and run the following command:
docker-compose up -d
Attention
On Linux, you may need to have root right to execute commands.
After launching the containers, the client application will be available at http://localhost, swagger host of the node - http://localhost/node-0. Now you can configure the platform for sending transactions.
To stop running nodes and services, execute the following command:
docker-compose down
Connecting a single node to the Mainnet network
Using the instructions below, you can connect the node to any existing network.
To connect the node to the Mainnet network you will need the following files: docker-compose.yml, node.license, node.conf` and the key repository as a file ``keystores.dat.
Hint
The file keystores.dat is created when you generate a new member address.
Download the file docker-compose.yml.
Download the file mainnet.conf, rename it
node.confand edit the following options:
owner-address,wallet.password- the address of the new participant, on whose behalf the node will perform operations in the blockchain. The process of generating a new key pair and filekeystores.datusing the utilitygenerators-X.X.X.jaris described in section Accounts creation;node-name- any name of the node;auth.api-api-key-hash,auth.privacy-api-key-hash- hash from a secret phrase to access REST API node. The process of creating a hashed secret phrase using the utilitygenerators-X.X.X.jaris described in section Accounts creation.
Create empty files:
postgres.env,node-0.env,nginx-proxy.env,frontend.env,data-service.env,crawler.env,auth-service.env.Open the file
my-node/env/node-0.envand copy the text below to it:
LOG_LEVEL=DEBUG
WE_NODE_OWNER_PASSWORD_EMPTY=false
WE_NODE_OWNER_PASSWORD= /FILL
JAVA_OPTS=-Dwe.check-resources=false
In the field
WE_NODE_OWNER_PASSWORDinstead of/FILLenter the password from the key pair created when generating the address of a new participant by the utilitygenerators-X.X.X.Jar.Place the downloaded and previously created files according to the structure below:
my-node                                 (directory with any name)
|- configs                              (directory)
|   |- nodes                            (directory)
|       |- node-0                       (directory)
|           |- node.conf                (file)
|           |- keystores.dat            (file)
|           |- node.license             (file, optional)
|- env                                  (directory)
|   |- postgres.env                     (file)
|   |- node-0.env                       (file)
|   |- nginx-proxy.env                  (file)
|   |- frontend.env                     (file)
|   |- data-service.env                 (file)
|   |- crawler.env                      (file)
|   |- auth-service.env                 (file)
|- docker-compose.yml                   (file)
Run the command to start the node:
docker-compose up -d node-0
After the container is launched node REST API will be available at http://localhost/node-0.
Attention
If there are errors, make sure that no other competing containers or programs are running. To display a list of running containers and their status, type docker ps -a. To stop the selected container, enter docker stop [myContainer]. To stop all containers, you can enter docker stop $(docker ps -a -q). The command docker rm [myContainer] will delete the selected one, docker rm $(docker ps -a -q) will delete all containers.
To stop running nodes and services, execute the following command:
docker-compose down
Sending transactions from the web client
Follow these steps after the blockchain platform full start:
Open a browser and enter the
http://localhostaddress.Register in the web client using any valid email address and log in to the web client.
Open the
Choose address -> Add addressmanually page.Fill in the fields below. You can take the values from the
accounts.confconfiguration file of the first node in thenodes/node-0directory.Node network address - specify the
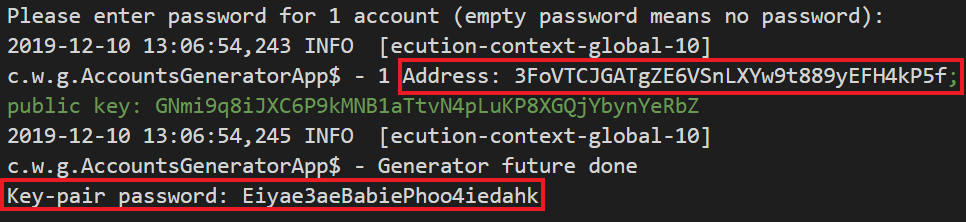
http://localhost/nodeAddressvalue.Address - specify the node address. See the
Addressfield marked in the picture below.Key pair password - specify the key pair password of the node. See the
Key-pair passwordfield marked in the picture below.
It is now possible to send transactions from the web client from the node address which has tokens.